
When spring rolls around, there’s a few things you need to do to get your camper or RV back on the road. Flushing out the antifreeze is a crucial step in preparing your camper for the upcoming season. If you’re new to camping or unsure about how to flush out the antifreeze, don’t worry. In this article, we’ll guide you through the process, step-by-step.
The process of flushing out antifreeze from your camper can seem daunting, but it’s actually a relatively simple and straightforward process. By following a few simple steps, you can ensure that all the antifreeze is out of your system and your camper is ready to use. In this article, we’ll provide you with a detailed guide on how to flush out antifreeze from your camper.
What You Need To Know About RV Antifreeze
When it comes to winterizing your camper, RV antifreeze is an essential component. Here are a few things you need to know about RV antifreeze:
Types of RV Antifreeze
There are two types of RV antifreeze: non-toxic and toxic. Non-toxic antifreeze is made from propylene glycol and is safe for humans and animals. Toxic antifreeze, on the other hand, is made from ethylene glycol and is poisonous if ingested.
Ethylene Glycol vs. Propylene Glycol
Ethylene glycol is a type of antifreeze that is commonly used in cars and other vehicles. It is toxic and can be lethal if ingested. Propylene glycol, on the other hand, is non-toxic and is commonly used in RV antifreeze.
Ethanol-Based Antifreeze
Some RV antifreeze is made from ethanol, which is a type of alcohol. Ethanol-based antifreeze is flammable and should be handled with care.
Biodegradable Antifreeze
If you are concerned about the environment, you may want to consider using biodegradable antifreeze. Biodegradable antifreeze is made from natural ingredients and is less harmful to the environment than traditional antifreeze.
Flushing Out Antifreeze
When it comes time to flush out the antifreeze from your camper, be sure to follow the manufacturer’s instructions carefully. It is important to flush out all of the antifreeze to prevent any damage to your plumbing system.
Proper Disposal
When you are done flushing out the antifreeze, be sure to dispose of it properly. Do not pour it down the drain or into the ground. Check with your local waste management facility to find out the proper way to dispose of antifreeze in your area.
Preparing for the Flush
Before you start flushing out the RV antifreeze, there are a few things you need to prepare. Here are some steps to follow:
- Check for any leaks or damages: Inspect the RV’s plumbing system, including the water tank, faucets, valves, and low-point drains, for any leaks or damages. If you find any, fix them before proceeding with the flush.
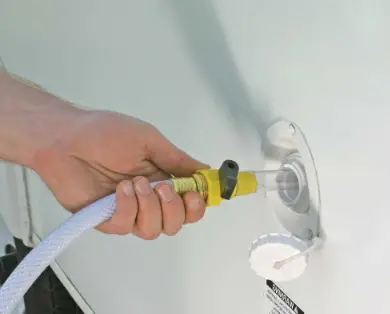
- Flush the plumbing system: Before you start flushing the antifreeze, it’s essential to flush the plumbing system with fresh water. Connect the RV to city water or fill the freshwater tank with 5-10 gallons of water and turn on the water pump to allow water to flow through the RV’s plumbing system. This step will help remove any debris or sediment that may have accumulated during winter storage.
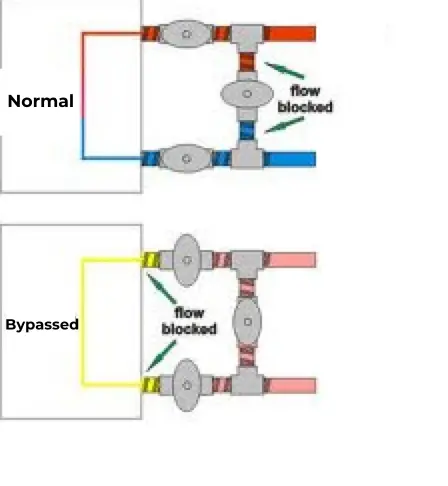
- Bypass the water heater: If you bypassed the water heater during winterization, make sure to reconnect it before flushing the antifreeze. If you didn’t bypass the water heater, you’ll need to drain it before flushing the antifreeze. Refer to your RV’s owner manual for specific instructions.
- Replace the water filter cartridges: If your RV has water filters, replace them before flushing the antifreeze. This step will ensure that you have clean water flowing through your plumbing system.
- Flush the holding tanks: Before flushing the antifreeze, flush the black water and gray water holding tanks to remove any waste or debris that may have accumulated during winter storage.
By following these steps, you’ll prepare your RV’s plumbing system for the antifreeze flush. In the next section, we’ll discuss how to flush the antifreeze from your RV’s plumbing system.
The Flushing Process
Flushing the antifreeze out of your camper is an important step in preparing your RV for the camping season. Here are the steps you need to take to flush the antifreeze out of your RV’s water system.
Fill Your Fresh Water Tank
The first step is to fill your fresh water tank with 5-10 gallons of water. If you’re connected to city water, make sure to turn off the water supply before proceeding to the next step.
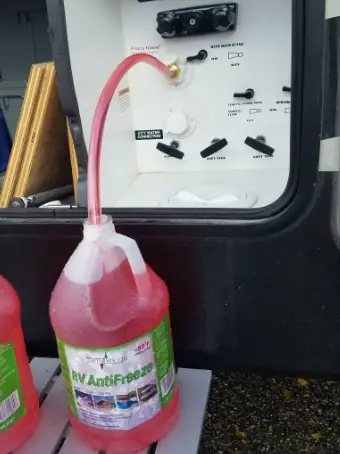
Turn On Your RV’s Water Pump
Turn on your RV’s water pump to allow water to flow through the RV’s water system. This will help flush the antifreeze out of the pipes and water tank.
See Related: RV Water Pump Keeps Running? Here’s How To Fix It
Open Up All Your Faucets and Water Taps
Open up all your faucets and water taps, including the hot water faucet, to allow water to run through the system. This will help flush out any remaining antifreeze from the RV’s water system. Let the water run for at least 20 minutes or until there is no more antifreeze coming out of the faucets.
Let The Water Run Until It’s Completely Clear
Let the water run until it’s completely clear, indicating that all of the antifreeze has been flushed out of the system. This may take a few minutes, depending on the size of your RV’s water system.
Turn Off Your Faucets
Turn off all your faucets and water taps to stop the flow of water through the RV’s water system.
Turn Off Your RV’s Water Pump
Turn off your RV’s water pump to stop the flow of water through the RV’s water system.
Reset Your RV Water Heater
Reset your RV water heater if necessary. Refer to your RV’s owner’s manual for instructions on how to reset your water heater.
Drain Your Water Heater (If It Has RV Antifreeze In It)
If your RV’s water heater has RV antifreeze in it, drain the water heater to remove any remaining antifreeze. Refer to your RV’s owner’s manual for instructions on how to drain your water heater.
Check and/or Replace Your Water Filter(s)
Check and/or replace your RV’s water filter(s). Refer to your RV’s owner’s manual for instructions on how to check and/or replace your water filter(s).
Empty Your Grey Water Tank
Finally, empty your grey water tank to complete the flushing process.
See Related: Can You Dump Gray Water On The Ground?
By following these steps, you can flush the antifreeze out of your RV’s water system and prepare your camper for the camping season.
Safety and Disposal of Antifreeze
When flushing antifreeze from your camper’s coolant system, it’s important to take appropriate safety measures and dispose of the used antifreeze properly. Here are some tips to keep in mind:
- Safety measures: Antifreeze can be toxic and can cause serious harm if ingested. Always wear gloves and protective clothing when handling antifreeze, and avoid breathing in the fumes. If you do come into contact with antifreeze, wash your skin immediately with soap and water. If you accidentally ingest antifreeze, seek medical attention right away.
- Disposal: Used antifreeze should never be poured down the drain or onto the ground. It can contaminate water sources and harm wildlife. Instead, take it to a local recycling center or hazardous waste facility that accepts antifreeze. Some auto parts stores may also accept used antifreeze for recycling.
See Related: Is RV Antifreeze Safe For Septic Systems?
- Caution with animals: Antifreeze has a sweet taste that can attract animals, but it’s highly toxic to them. Keep your pets and other animals away from any spills or leaks of antifreeze. If you suspect your pet has ingested antifreeze, seek veterinary care immediately.
- Consumption: Never consume antifreeze, even in small amounts. It can cause serious harm or even death.
By following these safety and disposal guidelines, you can help protect yourself, your family, and the environment from the harmful effects of antifreeze.
Still Tasting and Smelling Antifreeze After The Flush?
If you’re still tasting and smelling antifreeze after flushing your camper, you’re not alone. It’s a common problem that can be caused by a few different factors. Here are some possible reasons why you might still be experiencing this issue and what you can do about it:
- Residual antifreeze in the water lines: Even if you’ve flushed your water lines thoroughly, there may still be some residual antifreeze left behind. This can cause your water to taste and smell like antifreeze. To fix this problem, you can try flushing your water lines again with fresh water. You may need to do this several times to completely remove all the antifreeze from your system.
- Contaminated fresh water tank: If your fresh water tank is contaminated, it can cause your water to taste and smell bad. To fix this problem, you’ll need to sanitize your fresh water tank.
- Contaminated hot water tank: If your hot water tank is contaminated, it can cause your water to taste and smell bad. To fix this problem, you’ll need to flush and sanitize your hot water tank.
By following these steps, you should be able to eliminate the taste and smell of antifreeze from your water system. Keep in mind that it may take a few tries to completely remove all the antifreeze from your system, but with persistence, you should be able to enjoy clean, fresh water in your camper.
Understanding the Role of Climate
When winterizing your camper, it’s important to consider the climate you’ll be storing it in. Cold climates and freezing temperatures can cause serious damage to your camper’s plumbing system, so it’s crucial to take the necessary precautions to protect it.
The freezing point of water is 32°F (0°C), and when water freezes, it expands. This expansion can cause pipes to burst, leading to costly repairs. That’s why it’s important to winterize your camper before storing it in cold temperatures.
If you live in an area with mild winters, you may not need to winterize your camper as extensively as someone who lives in a colder climate. However, it’s still important to take some precautions to protect your plumbing system from potential damage.
When winterizing your camper, it’s important to use antifreeze specifically designed for RVs. Regular automotive antifreeze can be harmful to your plumbing system and should not be used.
In addition to using the correct antifreeze, you should also make sure to properly drain and flush your camper’s plumbing system before adding the antifreeze. This will ensure that there is no water left in the system that could potentially freeze and cause damage.