

Putting up a dome tent by yourself can seem daunting, but with the right tips and tricks, it can be a breeze. Whether you’re camping in a designated campground or backpacking in the wilderness, knowing how to set up a dome tent solo is essential for a successful trip.
Start by picking a good, flat location that’s free of stones and other big debris. Unpack and unfold your tent, laying it flat, then assemble the poles, attach the tent to the poles, stake the tent down, and attach your rain fly. Easy!
We’ll go through each step in detail in this guide.
Choosing the Right Location

When setting up a dome tent by yourself, choosing the right location is crucial to ensure a comfortable and safe camping experience. Here are some tips to help you find the perfect spot:
Avoiding Flooding Areas
When looking for a campsite, it’s important to avoid low-lying areas or areas that are prone to flooding. Check the weather forecast before choosing a location and avoid areas that are likely to get flooded during heavy rainfall.
Setting up your tent on wet ground can also lead to discomfort and make it harder to secure the tent.
Finding Free Campsites
If you’re on a tight budget, finding free campsites can be a great option. National parks and BLM land often have free campsites available, but they can fill up quickly during peak season. Research ahead of time and arrive early to secure a spot.
Some websites also offer information on free campsites in your area, so be sure to check those out.
Selecting Higher Ground
When possible, it’s best to select a campsite on higher ground. This not only helps avoid flooding but also provides a better view and can be more comfortable.
Look for areas that are flat and have good drainage. Avoid setting up your tent on slopes or uneven ground, as this can lead to discomfort and make it harder to secure the tent.
Remember, always follow Leave No Trace principles and respect the environment when choosing a campsite.
Preparing the Campsite
When setting up a dome tent, it is important to choose a flat spot that is free from rocks, sticks, and other debris. This will help ensure that the tent is stable and that the occupants are comfortable. Here are some steps to follow when preparing the campsite.
Clearing the Ground
Before setting up the tent, clear the ground of any debris, including rocks, sticks, and leaves. This will help ensure that the tent is stable and that the occupants are comfortable.
If there are any large rocks or roots, remove them using a shovel or other tool.
Laying the Ground Tarp or Footprint
Once the ground is clear, lay down a ground tarp or footprint. This will help protect the bottom of the tent from moisture and abrasion. Make sure the tarp is slightly smaller than the tent floor so that rainwater doesn’t pool underneath the tent.
If you don’t have a ground tarp or footprint, you can use a plastic sheet or a tarpaulin instead.
When laying down the ground tarp or footprint, make sure it is centered on the flat spot you have chosen. This will help ensure that the tent is properly positioned and that the occupants are comfortable.
If the ground is wet, make sure the tarp is completely dry before laying it down.
Unpack Your Tent
Before you start setting up your dome tent, the first step is to unpack it and lay everything out. This will help you ensure that you have all the necessary components and make the setup process smoother.
Start by laying out the tent body, rainfly, and poles. Check for any damage or missing parts before proceeding. If you notice any defects, contact the manufacturer immediately to address the issue.
Next, locate the stakes and guylines. Stakes are used to secure the tent to the ground, while guylines provide additional stability in windy conditions. Make sure you have enough stakes and guylines for your specific tent model.
Once everything is laid out, it’s time to attach the rainfly to the tent body. The rainfly is an essential component that provides protection from rain and wind. Make sure it’s properly attached and secured to the tent body before proceeding.
Finally, inspect the tent body and rainfly for any signs of damage or wear and tear. If you notice any issues, address them before setting up the tent.
By taking the time to unpack and inspect your tent, you’ll be better prepared for the setup process and ensure a safe and enjoyable camping experience.
Assembling the Dome Tent
Putting up a dome tent by yourself may seem daunting, but with the right instructions and a little bit of practice, it can be a breeze. Follow these steps to assemble your dome tent solo with ease.
Unfolding the Tent
Before you begin assembling the tent, you will need to unfold it. Lay the tent flat on the ground with the door facing up. Unfold the tent by pulling the corners of the tent away from each other until the tent is fully extended. Make sure that the poles are not tangled or twisted.
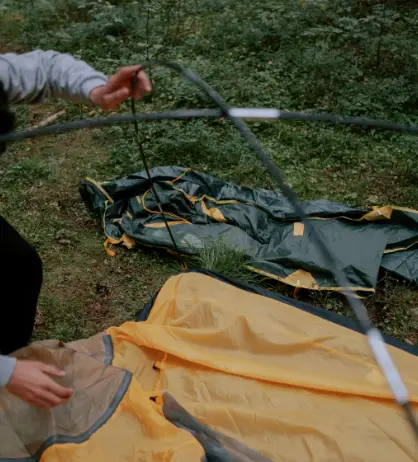
Assembling the Poles
Next, assemble the poles. Most dome tents come with two or three poles that need to be connected. Start by sliding the poles through the sleeves on the tent. Once the poles are in place, connect them by inserting the smaller end of one pole into the larger end of another pole.
Repeat this process until all the poles are connected.
Attaching the Tent to Poles
Once the poles are connected, it’s time to attach the tent to the poles. Start by attaching the corners of the tent to the poles. Some tents have clips that attach to the poles, while others have sleeves that slide over the poles.
Make sure that the tent is evenly distributed on the poles.
After the corners are attached, move to the center of the tent and attach it to the poles. If the tent is not taut, adjust the tension by moving the poles slightly.
With the tent attached to the poles, it’s time to stake it down, which we’ll cover next.
Securing the Tent
Once the tent is assembled, it’s important to secure it properly to prevent it from toppling over or collapsing in the wind. This section will cover two main methods for securing the tent: staking and guy lines.
Staking the Tent
Staking the tent involves using stakes to anchor the corners of the tent to the ground. It’s important to choose the right type of stake for the ground you’re camping on. For example, if you’re camping on rocky ground, you may need longer, stronger stakes that can penetrate the ground.
If you’re camping on soft soil, you may need wider stakes that can provide more surface area for stability.
To stake the tent, start by inserting the stakes into the ground at a 45-degree angle, with the top of the stake pointing away from the tent.
Then attach the guy lines to the stakes using the attached loops or hooks. Make sure the lines are tight and secure, but not so tight that they pull the tent out of shape.
Securing with Guy Lines
Guy lines are cords that attach to the tent and provide additional stability in windy conditions. To attach the guy lines, start by locating the attachment points on the tent. These are usually located near the corners and along the sides of the tent.
Next, attach the guy lines to the tent using the attached loops or hooks. Then, stake the other end of the guy line into the ground at a 45-degree angle, making sure it’s tight and secure. Repeat this process for all the guy lines.
It’s important to note that guy lines should not be too tight, as this can cause the tent to become misshapen and unstable. Instead, aim for a moderate level of tension that provides stability without distorting the shape of the tent.
Adding the Rain Fly

When camping, it is important to be prepared for any weather conditions. Adding a rain fly to your dome tent is a crucial step in ensuring that you stay dry during rainy weather. In this section, we will cover how to attach the rain fly to your tent and how to ensure maximum rain protection.
Attaching the Rain Fly
Attaching the rain fly to your tent is a simple process that can be done in just a few steps. First, locate the rain fly and lay it out flat on the ground. Then, find the four corners of the rain fly and locate the corresponding attachment points on the tent. Most tents will have clips or hooks that the rain fly can be attached to.
Attach the rain fly to the tent by securing the clips or hooks to the attachment points. Make sure that the rain fly is pulled tight and is covering the entire tent. If your tent has a vestibule, make sure that the rain fly is also covering this area.
Ensuring Rain Protection
Once the rain fly is attached to your tent, it is important to ensure that you have maximum rain protection. One way to do this is to make sure that the rain fly is pulled tight and is not sagging. If the rain fly is sagging, rainwater can pool on top of the tent and seep through the material.
Another way to ensure maximum rain protection is to use guylines to pull the rain fly away from the tent. Guylines are ropes that are attached to the rain fly and are secured to the ground with stakes. By using guylines, you can create a gap between the rain fly and the tent, which will allow rainwater to run off the tent.
In addition to providing rain protection, the rain fly can also provide shade during sunny weather. By leaving the rain fly attached to your tent during the day, you can create a shaded area where you can relax and stay cool.
In conclusion, adding a rain fly to your dome tent is an important step in ensuring that you stay dry during rainy weather. By following the steps outlined in this section, you can attach the rain fly to your tent and ensure maximum rain protection.
In preparation for your trip, check out our other great camping and tent guides while you’re here:
How To Heat A Tent Without Electricity