
Are you planning a camping trip but worried about leveling your camper? Look no further! In this article, we’ll provide you with a step-by-step guide on how to level your camper and ensure a comfortable and safe camping experience. Whether you’re a seasoned camper or a first-timer, we’ve got you covered.
The easiest way to level a camper is to pick out a level site, level the camper from side to side first, then level it from front to back second. After that, you’ll unhitch the camper and use your stabilizing jacks to get everything perfect.
We’ll cover everything you need to know about leveling your camper below.
Why Leveling Your Camper Is Important
Leveling your camper is essential to ensure a comfortable and safe camping experience. When a camper is not level, it can lead to a host of problems, such as difficulty opening and closing doors and cupboards, malfunctioning slide outs, and even damage to the camper’s frame.
An unlevel camper can also cause safety issues, especially when it comes to using appliances like the refrigerator and stove.
One of the primary reasons to level a camper is to ensure that the RV refrigerator works correctly. A refrigerator that is not level may not cool properly, leading to spoiled food and drinks. It can damage the refrigerator’s compressor, leading to costly repairs.
Slide outs require your RV to be on a level surface to work correctly. Slide outs are a popular feature in many modern campers, but they require a level surface to function correctly. An unlevel camper can cause slide outs to malfunction, leading to costly repairs.
Leveling your camper is also important for safety reasons. When a camper is not level, it can cause appliances like pumps and compressors to work harder than they should, leading to premature wear and tear. Additionally, an unlevel camper can cause doors and cupboards to open unexpectedly, leading to potential injury.
Finally, leveling your camper is essential for your comfort. A camper that is not level can cause you to feel off-balance and uncomfortable. Moreover, an unlevel camper can cause you to roll to one side of the bed, making it difficult to get a good night’s sleep.
In conclusion, leveling your camper is essential to ensure a comfortable and safe camping experience. It is important to take the time to level your camper correctly to avoid any potential issues with appliances, slides outs, and safety.
Tools You’ll Need
To level a camper, you’ll need a few essential tools. These tools will help you stabilize your camper and ensure it’s level on uneven ground. Here are the tools you’ll need:
Bubble Level

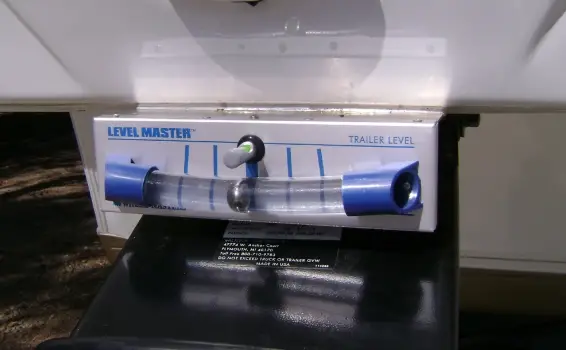
A bubble level is an essential tool for leveling your camper. It’s a small, handheld device that helps you determine whether your camper is level or not. To use a bubble level, simply place it on a flat surface, such as your camper’s floor, and adjust your camper until the bubble is centered.
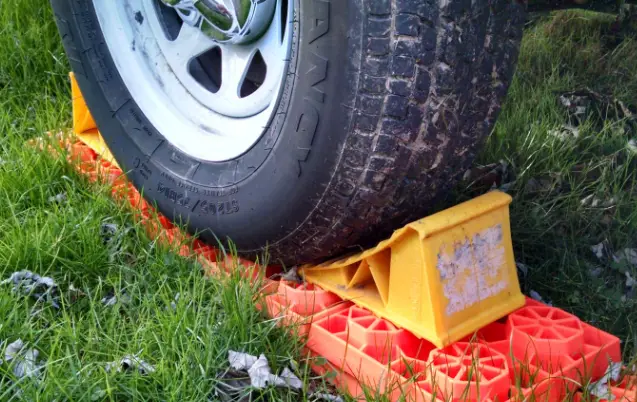
Leveling Blocks
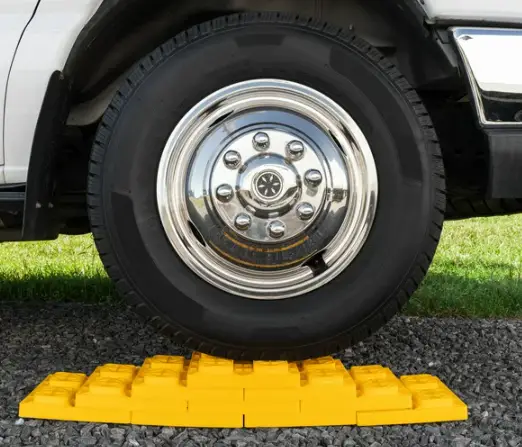
Leveling blocks are another essential tool for leveling your camper. They’re small, stackable blocks that you can use to raise one side of your camper to make it level. To use leveling blocks, simply place them under the low side of your camper and drive up onto them until your camper is level.
Wheel Chocks
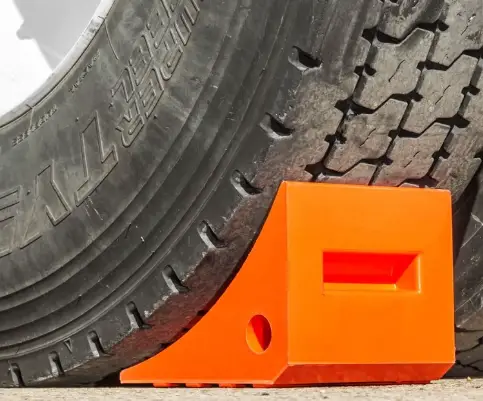
Wheel chocks are essential for keeping your camper in place while you’re leveling it. They’re small, wedge-shaped blocks that you place behind your camper’s wheels to prevent it from rolling. Make sure to use wheel chocks on both sides of your camper.
Shovel

A shovel is useful for leveling the ground where you’ll park your camper. If the ground is uneven, you may need to dig out some dirt to make it level. A shovel can also be used to create a level spot for your camper’s tongue jack stand.
Tongue Jack Stand
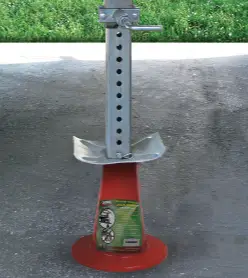
A tongue jack stand is a small, portable stand that you place under your camper’s tongue jack to stabilize it. It helps prevent your camper from tipping over while you’re leveling it. Make sure to use a tongue jack stand on both sides of your camper.
LevelMatePro
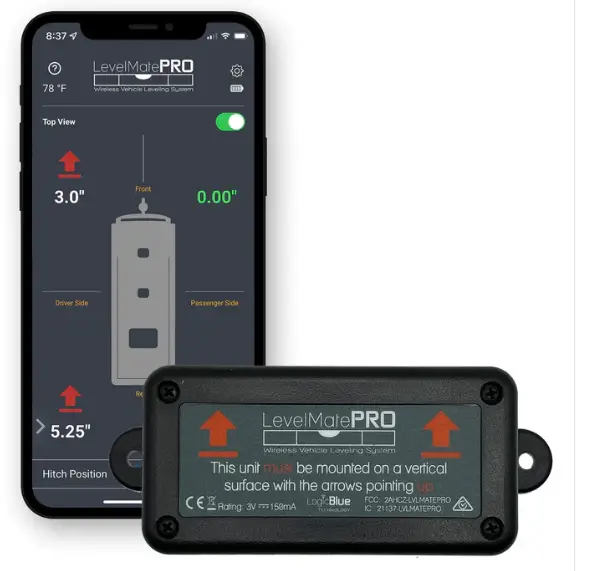
LevelMatePro is a device that helps you determine whether your camper is level or not. It uses Bluetooth to connect to your smartphone and provides real-time level readings. It’s an excellent tool for those who want to make sure their camper is perfectly level.
Identify A Level Spot
When parking your camper, it’s essential to find a level spot to ensure the comfort and safety of everyone inside. However, finding a level spot can be challenging, especially if you’re parking in an area with uneven terrain or ground.
The first step in identifying a level spot is to park your camper on a flat surface. If you’re parking on an asphalt surface, it’s usually easier to find a level spot. However, if you’re parking on uneven ground, you may need to take a few extra steps to identify a level spot.
One way to identify a level spot is to use a leveling app on your smartphone. These apps use your phone’s accelerometer to determine if the ground is level. Simply place your phone on the ground where you plan to park your camper, and the app will tell you if the spot is level or not.
Another way to identify a level spot is to use a bubble level or a carpenter’s level. These levels can be found at most hardware stores and are relatively inexpensive. Simply place the level on the ground where you plan to park your camper, and adjust the spot until the level is perfectly level.
If you’re parking in the Pacific Northwest, you may need to take extra precautions when identifying a level spot. The terrain in this region can be quite hilly, and finding a level spot can be challenging. In this case, it’s essential to take your time and use all the tools at your disposal to ensure that your camper is parked on a level spot.
In conclusion, identifying a level spot is crucial when parking your camper. By using a leveling app or a bubble level, you can ensure that your camper is parked on a level spot, even on uneven terrain or ground.
Level Your Camper Side To Side First
When it comes to leveling a camper without moving it, the first step is to level it from side to side. This is important because it will ensure that the refrigerator works properly, prevent any water from pooling in the shower or sink, and make sleeping more comfortable.
To level your camper from side to side, you will need to use leveling blocks. These blocks are designed to be placed under the low side of the camper to raise it up and make it level. You may also need to use chocks to prevent the camper from rolling away while you level it.
To begin, park the camper on a level surface and determine which side is lower. Place the leveling blocks on the ground under the low side of the camper, making sure they are positioned in such a way that they will not shift or move while you are leveling the camper.
Next, slowly drive the camper forward onto the leveling blocks, stopping periodically to check the level of the camper with a bubble level. Continue driving onto the blocks and add them as necessary until the camper is level from side to side.
Once the camper is level, place chocks on both sides of the wheels to prevent the camper from rolling away. It is important to make sure the chocks are secure and will not move while you are inside the camper.
Chock Your Tires
Wheel chocks are wedge-shaped blocks that prevent the camper from rolling away. They’re placed behind the tires of any vehicle parked on an incline or need to be held steady.
To use wheel chocks, start by parking the camper on a level surface. Then, place the chocks directly behind each tire on top of any blocks. When two wheel chocks are placed directly behind each tire, it creates a wedge effect that keeps the vehicle from rolling away.
It’s important to make sure the wheel chocks are secure and won’t move. To do this, give the camper a gentle push to test the stability of the chocks. If the camper doesn’t move, the chocks are secure.
It’s also important to note that wheel chocks are not meant to level the camper. They only keep the camper from rolling away.
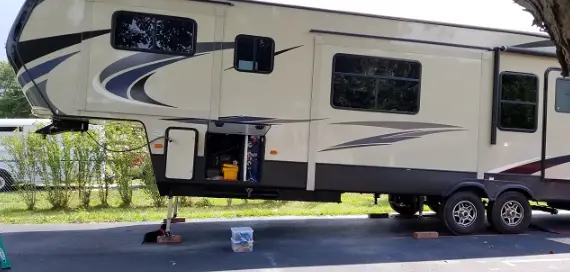
Unhitch Your Camper From The Tow Vehicle
When it comes to leveling a camper, it is essential to first unhitch it from the tow vehicle. This step is crucial as it allows the camper to be leveled independently of the tow vehicle, ensuring maximum stability and safety.
To begin, the first step is to park the tow vehicle and the camper on a level surface. Next, the camper’s stabilizing jacks should be lowered to provide additional stability. Then, the weight distribution bars should be removed, and the hitch lock should be released.
Once the hitch lock is released, the camper can be lifted off the hitch ball by using the tongue jack. It is essential to ensure that the camper is lifted high enough to clear the hitch ball and the tow vehicle’s tailgate. Once the camper is lifted, the hitch should be pulled out of the hitch receiver, and the safety chains should be disconnected.
After the camper is detached from the tow vehicle, it can be leveled using leveling blocks or jacks. Leveling blocks can be placed under the camper’s tires to raise the camper’s low side, while jacks can be used to raise the camper’s low side. It is essential to ensure that the camper is level both from side to side and front to back to prevent any issues with the refrigerator, plumbing, or other appliances.
In conclusion, unhitching the camper from the tow vehicle is a crucial step in leveling a camper. By following the steps mentioned above, campers can ensure that their camper is level and stable, providing a comfortable and safe camping experience.
Level Your Camper Back To Front
The next step involves leveling the camper from back to front. If the camper is not level, it can cause discomfort while sleeping and make cooking and other activities more difficult.
To level the camper back to front, start by using the tongue jack to raise the front of the camper until it is level. The tongue jack is located at the front of the camper and is used to lift the camper off the hitch. Once the front of the camper is level, place a leveling block or piece of wood under the tongue jack to keep it level.
Lower Your Camper’s Stabilizing Jacks

When it comes to leveling a camper, stabilizing jacks are an essential tool. These jacks are designed to provide support and prevent the camper from shaking or wobbling while parked. Here are some simple steps to lower your camper’s stabilizing jacks:
- Locate the Stabilizing Jacks – The stabilizing jacks are usually located near the corners of the camper. They are designed to be easily accessible and visible.
- Position the Camper – Before lowering the stabilizing jacks, it’s important to position the camper on a level surface. This will ensure that the jacks are properly aligned and will provide the necessary support.
- Lower the Jacks – Once the camper is properly positioned, it’s time to lower the stabilizing jacks. This can be done manually using a crank handle or with an electric drill. Simply insert the crank handle or drill into the jack and turn it clockwise to lower the jack.
- Adjust the Height – Once the jacks are lowered, it’s important to adjust the height to ensure that the camper is level. This can be done by turning the crank handle or drill counterclockwise to raise the jack or clockwise to lower it.
- Test the Stability – After adjusting the height, it’s important to test the stability of the camper. This can be done by gently pushing on the camper to see if it wobbles or shakes. If it does, adjust the stabilizing jacks until the camper is stable.
Utilizing Auto-Leveling Systems
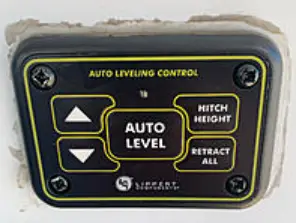
Auto-leveling systems are a popular option for leveling a camper without moving it. These systems are built into the camper and use hydraulic jacks to level the camper automatically. The system can be controlled by a touchpad or a remote control, making it easy to use.
One of the benefits of auto-leveling systems is that they save time and effort. Instead of manually leveling the camper using blocks or jacks, the auto-leveling system does it for you. This can be especially useful if you are camping alone or have limited physical ability.
Auto-leveling systems are also more accurate than manual leveling. The system uses sensors to detect the level of the camper, and adjusts the jacks accordingly. This ensures that the camper is level from side to side and front to back, which is important for comfort and safety.
It is important to note that not all campers come with an auto-leveling system. If you are interested in installing one, it is best to consult with a professional. They can help you choose the right system for your camper and ensure that it is installed correctly.
Overall, auto-leveling systems are a convenient and reliable option for leveling a camper without moving it. They save time and effort, and provide a more accurate level than manual methods.
Tips for Leveling on Different Terrains
Leveling a camper on uneven terrain can be challenging, but with the right tools and techniques, it can be done easily. Here are some tips for leveling a camper on different terrains:
Sand
If you are camping on a beach or in a desert, you will likely encounter sand, which can make it difficult to level your camper. One way to level your camper on sand is to use a shovel to dig out the sand from under the low side of the camper. You can also use a wedge system, which consists of two wedges that you place under the low side of the camper to level it.
River
If you are camping near a river, the ground can be soft and uneven, making it challenging to level your camper. One way to level your camper on soft ground is to use shims. Shims are small pieces of wood or plastic that you can place under the low side of the camper to level it. You can also use a wedge system to level your camper on soft ground.
Shovel
If you don’t have a wedge system or shims, you can use a shovel to level your camper. Simply dig out the ground under the low side of the camper until it is level. You can also use a piece of wood to help level the camper.
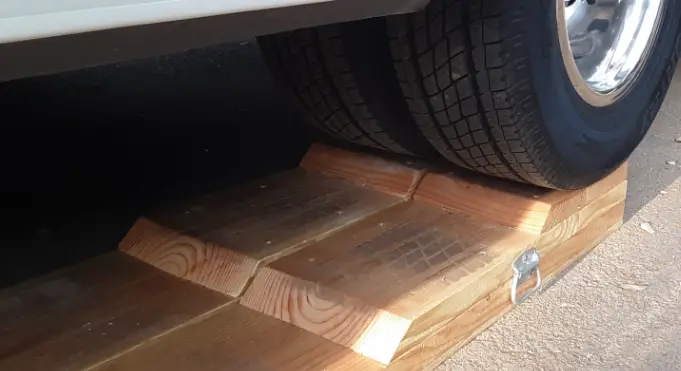
Wedge System
A wedge system is a simple and effective way to level your camper on uneven ground. A wedge system consists of two wedges that you place under the low side of the camper to level it. You can buy a wedge system at most camping supply stores, or you can make your own using wood or plastic.
Shims
Shims are small pieces of wood or plastic that you can place under the low side of the camper to level it. Shims are an easy and inexpensive way to level your camper on uneven ground. You can buy shims at most camping supply stores, or you can make your own using scrap wood or plastic.
By using the right tools and techniques, you can easily level your camper on different terrains. Whether you are camping on sand, near a river, or on soft ground, these tips will help you level your camper and enjoy a comfortable camping experience.
How To Level A Camper Without Moving It
Sometimes you either don’t have a tow vehicle available, or simply don’t want to move your camper but still need to make sure it’s level. Fortunately, there are several ways to level a camper without moving it.
One option is to use leveling blocks. These blocks are designed to be placed under the wheels of your camper to raise it to the desired level. You can stack them to achieve the desired height, and they come in different sizes and materials. Some of the most common materials are plastic and wood.
Another option is to use scissor jacks. These jacks are installed on the corners of your camper and can be extended or retracted to level your camper. You can use a bubble level to determine which corner needs to be raised or lowered. It’s important to note that scissor jacks are not meant to lift your camper, but only to stabilize it.
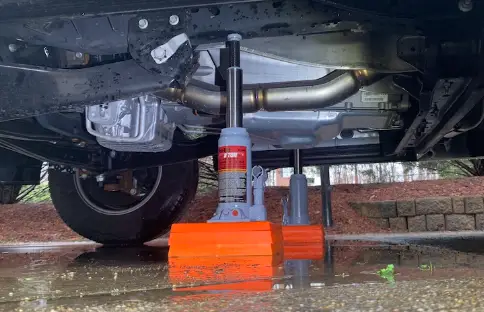
If you have a low spot on one side of your camper, you can use a bottle jack to raise it to the desired level. You can place the bottle jack under the frame of your camper and raise it until it’s level. Once your camper is level, you can use wheel chocks to secure it in place.
It’s important to note that leveling a camper without moving it can be a time-consuming process, and it requires patience and attention to detail. You should always use a bubble level to ensure that your camper is level, and you should never rely on your own judgment.
Is It Hard To Level A Camper?
Leveling a camper can be a little difficult the first few times, and requires some patience. It may take a few tries to get the camper level, but it is important to take the time to do it right. Rushing the process can lead to an uncomfortable and unsafe camping experience.
If a camper has an automatic leveling system, leveling can be done with the push of a button. Can I Use Stabilizer Jacks To Level A Parked Camper?
Stabilizer jacks are designed to stabilize a parked camper, not to level it. They are not intended to support the weight of the camper but rather to prevent it from rocking or swaying when someone walks inside or when the wind blows.
Using stabilizer jacks to level a parked camper can be dangerous and can cause damage to the camper. It is important to use leveling blocks or ramps to level a camper instead of relying on stabilizer jacks.
Can I Level A Camper With The Slides Out?
While some RVers may be tempted to level their camper with the slides out to save time and effort, it is generally not recommended to do so.
Leveling a camper with the slides out can cause the slide-out mechanisms to become misaligned. This can lead to damage to the slide-out system, making it difficult or impossible to retract the slide-out. Additionally, leveling a camper with the slides out can put additional stress on the camper’s frame, potentially causing damage over time.
If you do need to make adjustments to the camper’s level with the slides out, it is important to do so carefully and slowly. Use a high-quality leveling system to ensure proper support for the camper, and make sure to monitor the camper’s level as you make adjustments.
Check out our related guides while you’re here:
What to do if your travel trailer wheels are off the ground after leveling