
Nothing beats the feeling of hitting the open road in your RV and finally settling into your destination, getting everything set up, and finally settling in for some enjoyment. But as you extend the slideout, you notice there’s some sagging. Not only does it look bad, but inside it isn’t level either, which gets you wondering: how do you fix a sagging RV slide out?
How To Fix A Sagging RV Slide Out
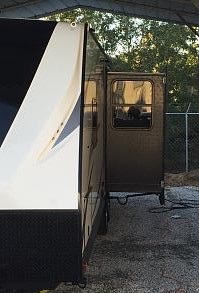
If you can see visible sagging or perhaps there’s a bigger gap than you might have previously noticed, chances are you have a sagging slideout.
Take the following steps to correct the sag going forward.
Step 1: Measure The Amount Of Sagging On Your RV Slide Out
Measure the distance from the sidewall of the coach to the outside edge of the slideout wall (both at the top and bottom) to determine how much sag you’re dealing with.
If the measurements are not equal (or extremely close), you have some sag to tackle.
RV Slide Out Leaning – It Could Be By Design!
Sometimes new RVers worry because they can visually see the slideout dipping away from the coach at the top and it seems like sagging, but it can actually be to aid in directing rain away from the RV.
To be sure, first make sure your RV is totally level on the ground, then check for level inside the slideout on the floor. Next, check the top of the slideout for level. If the RV and slideout floor are both level and the top is only off by a bit because it’s tipping away from the camper, you can rest assured that this is to aid in water drainage and you do not need to make any adjustments.
Step 2: Try Running The Slide In And Back Out Again
A slideout’s weight is supposed to be carried by the lip along the top end of the slide out pressing against the header beam inside the trailer wall located at the top of the slideout opening.
As the mechanism pushes out at the bottom of the slide out, the lip hits the header, tilting the outer edge of the slideout upwards, which removes the weight off the slideout mechanism so it strictly pushes outward without carrying the weight of the slide out.
Sometimes, the brake that holds the arms extended could have slipped, resulting in the arms retracting slightly and being the cause of your sagging slideout.
Other times, the outside edge of the interior floor could have sagged from supporting the slideout’s weight, which causes the inside edge of the slideout to drop.
Try running the slide out in, and then back out again, which can reset the arms and potentially fix your sag.
Step 3: Inspect Your Adjustment Hardware
Sometimes the bolts for adjusting your slide can snap off if they’re supporting more weight than intended.
If you notice missing or snapped hardware, you can take it to an RV shop where they can replace or weld new hardware, fixing the sagging slide out.
Step 4: Adjust Your RV Slide Out (But Do Your Homework First)
Any RV manufacturer will tell you that all slide-out adjustments should only be done by a certified service technician, and doing them yourself could void any and all warranty claims.
This doesn’t mean you can’t do the adjustment yourself- especially if your unit is no longer under any warranty coverage.
You should not just start adjusting things without knowing how everything works and how the adjustments will affect the performance of your slide out, so make sure to refer to your RV owner’s manual for specific instructions, and watch plenty of videos when possible.
How To Fix A Horizontally Sagging RV Slide Out
You can fix a horizontal sag in your RV slide out following these steps:
- Loosen the carriage bolts on each bracket located at the end of the slideout guide tubes.
- Position the room horizontally by pushing on the outside, sidewall or by using a prying device inserted into the opening between the slide out room and coach.
- Once the sag is corrected, tighten the carriage bolts to secure the positioning.
How To Fix A Vertically Sagging RV Slide Out
You can fix a vertical sag in your RV slide out following these steps:
- Loosen the carriage bolts on each bracket located at the end of the slideout guide tubes.
- Loosen the jam nut.
- Turn the vertical adjustment bolt up or down to position your room height and correct the sag.
- Once you’ve got the desired vertical position, tighten the jam nut and carriage bolts.
Check out this video for a good walkthrough on how to fix an RV slide out that’s sagging vertically:
This video covers how to fix a slide out that’s not sagging but is out of alignment. It still does a great job of explaining the different parts you’ll need to adjust:
And another video that goes over the adjustment process in-depth so you can fix your RV’s sagging slideout:
Step 5: Use Slide Out Supports
If you are wanting your sag repair to last or to keep it from getting worse, you need to invest in some RV slide out supports.
They’re affordable and easy to use, functioning very similar to a jack which will help take the weight off of the top support bar in your slideout, reducing the potential for sagging (or keeping it from sagging further).
DIY RV Slide Out Supports
We found a genius option to make your own RV slide out supports that are going to be much sturdier and easier to set up than most store-bought slideout supports.
Here’s what you’ll need to make DIY RV Slideout Supports:
- 2×4’s
- Bolts, Nuts, and Washers
- Eye Bolts
- Tie Down Straps
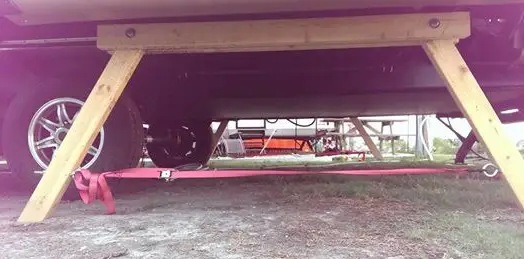
The way to visualize these supports is that you are making something that will eventually look like a sawhorse, but with a ratchet strap attaching the “legs” at the lower portion for extra strength. Keep this in mind as you read the following instructions.
- Measure your 2×4’s for the RV slide you wish to support, and cut two pieces of wood the length that will sit under the slide out rails.
- Cut two more pieces of 2×4’ that will serve as the legs of your support, measuring the distance at a 45-degree angle from the braces down to the ground.
- Drill a hole in the braces and the leg supports, attaching them all with bolts, washers, and nuts.
- Make sure to put two washers on each side of your “legs” between the brace pieces, as it should be able to move back and forth to accommodate different heights.
- At the bottom of the legs, attach the eye bolts on the inside of the legs facing each other, and fasten with a washer and nut.
- Attach a ratchet strap to each eyelet and tighten it up until snug, but not so much that it’s lifting the slideout further than needed – you just want to support the slideout, not jack it up.
- You can attach extra blocks on either or both sides (or bottoms) of the legs for extra stability if you like.
Wrapping Up How To Fix A Sagging RV Slideout
We hope this guide helped you to fix that sag and save a lot of time and money in the process.
What method did you use, and were there any extra tips you wish you would have known? Let us know in the comments below.
If you’re a DIY RVer, check out our guide to the 12 best RV outdoor kitchen mods and how to prep for an RV one night freeze while you’re here.