
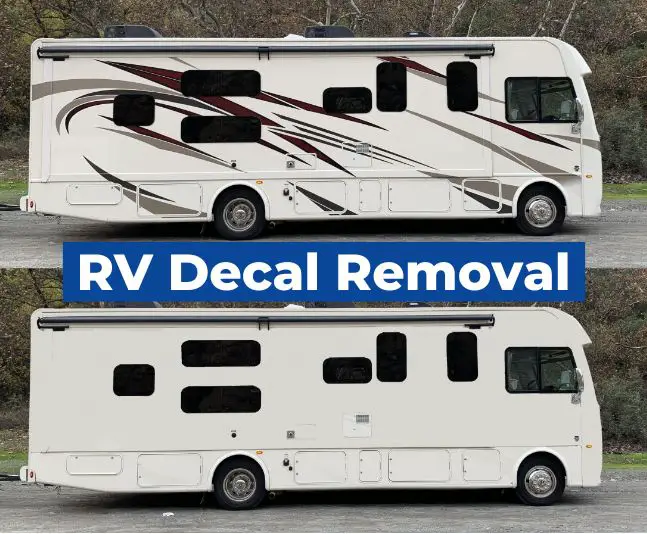
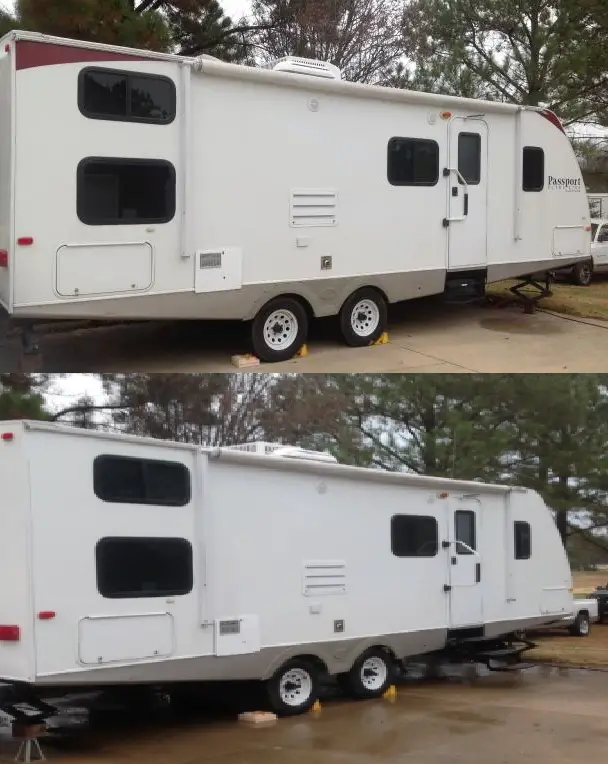
RV decal removal is an essential process for RV owners who want to restore or replace their faded or cracked decals. Decals can add a lot of personality and charm to an RV, but they can also become outdated or damaged over time. Fortunately, there are several methods for how to remove RV decals.
We’ll go over different methods of getting decals off your RV today, along with reasons why you may want to try this yourself to save time and money.
Why Remove RV Decals?
RV decals are a popular way to add personality and style to an RV. However, there are several reasons why someone might want to remove them. Here are some of the most common reasons:
Faded or Damaged Decals
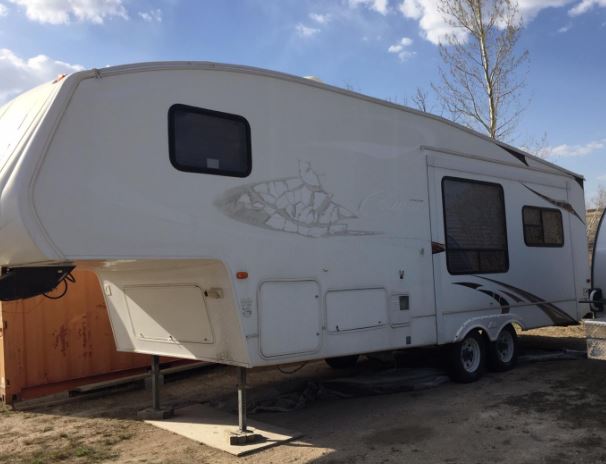
RV decals are often exposed to harsh weather conditions, which can cause them to fade or become damaged over time. This can make an RV look old and worn-out, even if it is well-maintained. Removing faded or damaged decals can help give an RV a fresh, updated look.
Personalization
Many RV owners choose to remove existing decals in order to personalize their RV with their own custom decals or designs. This can be a fun and creative way to make an RV truly unique.
Selling or Trading In
If an RV owner is planning to sell or trade in their RV, they may want to remove the existing decals in order to make the RV more appealing to potential buyers. Removing decals can help make an RV look newer and more well-maintained, the same way removing oxidation from RV fiberglass can.
Change in Style
RV owners may simply want to remove decals because they no longer like the style or design. Removing decals can give an RV a more neutral, classic look that may be more appealing to a wider range of people.
Overall, there are many reasons why someone might want to remove RV decals. Whether it is to update the look of an RV, personalize it, or make it more appealing to buyers, removing decals can be a simple and effective way to achieve these goals.
The Best Ways To Remove Decals From Your RV
Removing decals from an RV can be a frustrating task, but it’s a necessary one if you want to give your RV a fresh new look. There are several methods to remove decals from RVs, each with its own advantages and disadvantages. In this section, we will explore the four most popular ways to remove decals from your RV.
Heat
One of the most popular methods for removing decals from an RV is using heat. Heat can help soften the adhesive, making it easier to remove the decal. You can use a hairdryer, blow dryer, or heat gun to apply heat to the decal. Hold the heat source a few inches away from the decal and move it around slowly to avoid damaging the paint. Once the decal is heated, use a putty knife or razor blade to gently scrape it off.
Adhesive Removers
Adhesive removers are another popular method for removing decals from an RV. These products can dissolve the adhesive, making it easier to remove the decal. There are several adhesive removers available on the market, including Goof Off, Goo Gone, and WD-40. Apply the adhesive remover to the decal and let it sit for a few minutes. Then, use a putty knife or razor blade to gently scrape off the decal.
Chemicals and Solvents
Chemicals and solvents can also be used to remove decals from an RV. However, these products can be harsh on the paint and should be used with caution. One popular chemical for removing decals is 3M Adhesive Remover. Apply the chemical to the decal and let it sit for a few minutes. Then, use a putty knife or razor blade to gently scrape off the decal.
Eraser Wheel Drill Attachment
An eraser wheel drill attachment is a tool that can be used to remove decals from an RV. This tool attaches to a drill and spins a rubber wheel that can remove decals without damaging the paint. However, this tool can be expensive and may not be necessary for small decal removal jobs.
No matter which method you choose, there are a few tools you will need. These include a putty knife or razor blade, paper towels, gloves, and safety glasses. Always wear gloves and safety glasses when removing decals to protect your hands and eyes.
In summary, there are several ways to remove decals from an RV, each with its own advantages and disadvantages. Heat, adhesive removers, chemicals and solvents, and eraser wheel drill attachments are all popular methods. Be sure to use the proper tools and safety equipment when removing decals to avoid damaging your RV or injuring yourself.
Preparation
Before starting the RV decal removal process, it is important to prepare the area properly. This will ensure that the RV is not damaged during the process and that the decals are removed effectively.
Cleaning the Area
The first step in preparing the area is to clean the RV exterior thoroughly. This will remove any dirt, grime, or other debris that may interfere with the decal removal process. Use a mild soap and water solution and a soft sponge or cloth to clean the area. Rinse the area well with water and dry it with paper towels or a soft cloth.
Protecting the RV
To protect the RV during the decal removal process, it is important to cover any areas that are not being worked on. Use masking tape or painter’s tape to cover any areas that are adjacent to the decals. This will prevent any accidental damage to the RV exterior.
If the RV has fiberglass or vinyl siding, it is important to avoid using any harsh chemicals or abrasive materials during the decal removal process. These materials can damage the RV exterior and cause discoloration or other damage. Instead, use a heat gun or blow dryer to soften the adhesive on the decals and gently peel them off.
Direct sunlight can also be used to soften the adhesive on the decals. Park the RV in direct sunlight for a few hours before starting the decal removal process. This will make the decals easier to remove and reduce the risk of damage to the RV exterior.
In summary, proper preparation is crucial to ensure that the RV decal removal process is successful and that the RV is not damaged during the process. Cleaning the area and protecting the RV are important steps to take before starting the decal removal process.
Techniques for Removing RV Decals
When it comes to removing RV decals, there are several techniques that can be used. Each technique has its own advantages and disadvantages, so it is important to choose the right one for the job. In this section, we will discuss three techniques for removing RV decals: using heat, using chemicals, and using mechanical methods.
Using Heat
One of the most popular techniques for removing RV decals is using heat. This technique involves using a blow dryer or heat gun to warm up the decal, which makes it easier to peel off. Here’s how to do it:
- Use a blow dryer or heat gun to warm up the decal. Be sure to keep the heat moving and not focused on one spot for too long.
- Once the decal is warm, use a plastic scraper or putty knife to gently peel it off. Be careful not to damage the underlying surface.
- If any adhesive residue is left behind, use an adhesive remover such as Goof Off, Goo Gone, or WD-40 to clean it up.
Using heat is a great technique for removing RV decals because it is relatively easy and doesn’t require any special tools. However, it can be time-consuming, especially if you have a lot of decals to remove.
Using Chemicals
Another technique for removing RV decals is using chemicals. This technique involves using an adhesive remover such as Goof Off, Goo Gone, or WD-40 to dissolve the adhesive and make it easier to peel off the decal. Here’s how to do it:
- Apply the adhesive remover to the decal and let it sit for a few minutes.
- Use a plastic scraper or putty knife to gently peel off the decal. Be careful not to damage the underlying surface.
- If any adhesive residue is left behind, use more adhesive remover to clean it up.
Using chemicals is a quick and easy technique for removing RV decals, but it can be messy and may require some ventilation. It is also important to use the right type of adhesive remover for the job, as some products may damage certain surfaces.
Using Mechanical Methods
If the above techniques don’t work, you may need to use mechanical methods to remove RV decals. This technique involves using tools such as an eraser wheel, drill, razor, or putty knife to scrape off the decal and adhesive. Here’s how to do it:
- Choose the right tool for the job. For example, an eraser wheel is great for removing decals without damaging the underlying surface, while a razor or putty knife is better for scraping off stubborn adhesive.
- Use the tool to scrape off the decal and adhesive. Be careful not to damage the underlying surface.
- If necessary, use an adhesive remover to clean up any residue.
Using mechanical methods is a more aggressive technique for removing RV decals, but it can be effective for stubborn decals or adhesive. However, it is important to use the right tool for the job and be careful not to damage the underlying surface.
Tips and Tricks
Removing RV decals can be a challenging task, but with the right tools and techniques, it can be done efficiently. Here are some tips and tricks to help you remove RV decals like a pro.
Working with Faded Decals
Faded decals can be difficult to remove because the adhesive has become hardened over time. To remove faded decals, use a heat gun or a hairdryer to soften the adhesive. Then, use a plastic scraper to remove the decal gently. Be careful not to scratch the surface of the RV.
Removing Stubborn Adhesive
If the adhesive is stubborn and won’t come off, try using an adhesive remover such as Goo Gone, Goof Off, or WD-40. Apply the remover to the adhesive and let it sit for a few minutes. Then, use a plastic scraper to remove the adhesive gently.
Removing Graphics and Stripes
Removing graphics and stripes can be challenging because they often have multiple layers of vinyl. To remove graphics and stripes, use a heat gun or a hairdryer to soften the vinyl. Then, use a plastic scraper to remove the vinyl gently. If the vinyl is too stubborn, use an eraser wheel to remove it.
Dealing with Peeling Decals
Peeling decals can be frustrating to deal with because they can leave behind adhesive residue. To remove peeling decals, use a plastic scraper to remove the decal gently. Then, use an adhesive remover to remove the residue.
Removing Old Decals
Old decals can be challenging to remove because they have become worn and oxidized over time. To remove old decals, use a heat gun or a hairdryer to soften the adhesive. Then, use a plastic scraper to remove the decal gently. If the decal is too stubborn, use an eraser wheel to remove it.
Overall, removing RV decals can be a time-consuming task, but with the right tools and techniques, it can be done efficiently. Be patient and take your time to avoid damaging the RV’s surface.
Check out our other RV care guides while you’re here:
RV decorating ideas to make your RV more unique
How to de-winterize a camper, travel trailer, or RV