
If you’ve got an RV toilet not holding water then you’ve already learned the hard way just how important having a working toilet in your RV is.
Usually your RV toilet will hold a little bit of water in the bowl after flushing- if this is not the case, you need a way to fix it right away.
We’ve covered the top 6 reasons your RV toilet won’t hold water in today’s guide along with quick, easy, and affordable fixes to each problem.
Before we get into the causes and solutions, let’s first get a clear understanding of your RV toilet.
RV Toilets 101
The most popular brands of RV toilets you find are Aqua-Magic by Thetford, Dometic, and Sealand.
Fortunately, these are both very similar in how they work so the fixes in this guide will work on each.
RV toilets are pretty simple in how they operate – here’s an exploded diagram of an Aqua-Magic RV toilet and its parts:
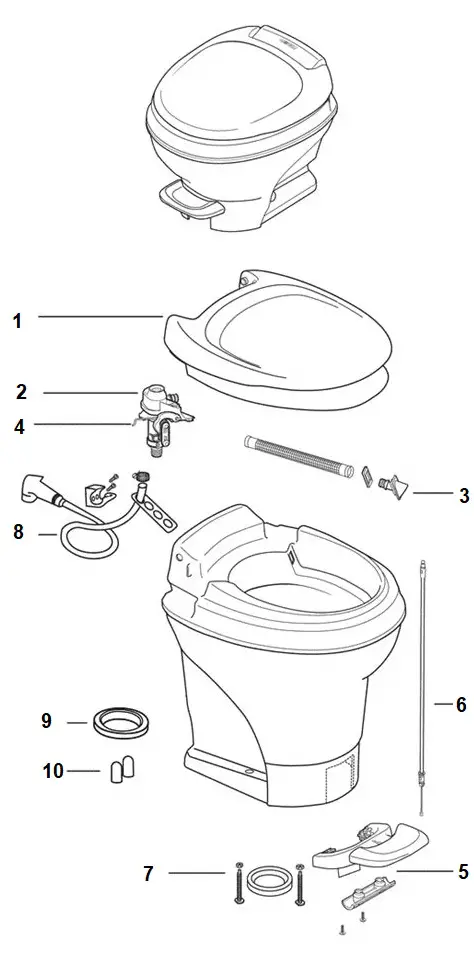
| Part Number | Description |
| 1 | Seat And Cover Assembly |
| 2 | Water Valve |
| 3 | Flush Tube & Nozzle Assembly |
| 4 | Water Valve Link |
| 5 | Flush Pedal |
| 6 | Foot Cable |
| 7 | Floor Flange |
| 8 | Hand Sprayer |
| 9 | Blade Seal / Toilet Seal |
| 10 | Bolt Caps |
6 Reasons Why Your RV Toilet Won’t Hold Water
Reason 1: You’ve Got A Leaking Or Broken RV Toilet Seal
In nearly all cases of RV toilets not keeping water in the bowl, the culprit is a damaged or leaky RV toilet seal.
RV toilets use a blade seal which is just a circular piece of rubber, and this rubber can harden or crack over time.
When the blade seal cracks or hardens it will no longer keep a tight seal, so the air gets in, disrupting the vacuum made by the seal, and the water drains from your RV toilet bowl.
Skip ahead: How To Replace RV Toilet Bowl Seal
Reason 2: Your RV Toilet Water Valve Is Broken
The toilet water valve on your RV toilet is usually plastic and breaks easily from being exposed to freezing temperatures, with the water inside cracking the piece and it not becoming apparent until the weather has warmed up again and you’re ready to use your RV.
Winterizing your camper and keeping it somewhere warm will prevent this from happening again, but luckily it’s a cheap and easy fix.
Skip ahead: How To Replace RV Toilet Water Valve
Reason 3: The RV Toilet Flange Is Damaged Or Broken
Just like your toilet at home, the flange connects the toilet to the drain pipe.
If the flange is broken or not holding a seal, you’ll have a leak at the bottom of your RV toilet, which can be messy and smelly.
Again, this is also an inexpensive fix that requires very little time to complete.
Skip ahead: How To Replace RV Toilet Flange
Reason 4: The RV Toilet Ball Valve Is Dislodged Or Needs Repair
Your RV toilet works a little differently from your toilet at home because it uses a ball valve which works together with your seal to keep water in your RV toilet bowl.
Sometimes this ball can become scratched or damaged by coarse toilet cleaners or hard water which affects the seal on your RV toilet.
As a precaution, don’t use gritty toilet cleaners as they will cause seal leaks over time.
Skip ahead: How To Repair RV Toilet Ball Valve
Reason 5: The RV Toilet Pedal Is Stuck Down
Occasionally your RV’s toilet pedal won’t return to the original position, so it’s stuck down and constantly keeping water out of your RV toilet bowl.
Try hitting the pedal’s joint with some lubricating spray like WD-40 or a silicone lubricant spray, then work the pedal back and forth a few times.
This will often fix this issue easily.
If that doesn’t resolve your problem, take a look at our guide to RV toilet foot pedal repair for some other common causes and how to fix them easily.
Reason 6: Your RV Toilet’s Other Parts Are Worn Out
Many RV toilet parts are made from plastic or rubber which can break easily, but are also inexpensive to replace.
How To Fix Your RV Toilet Not Holding Water
So we’ve covered what the reasons are that your toilet in your RV isn’t keeping water in the bowl, and now it’s time to review how to do these repairs.
Many of these repairs are simple and cost-effective, so we’ll walk you through each below.
Try This First Before Attempting To Repair Your RV Toilet
Sometimes you may not have any parts to replace, which will make your job much easier.
Start by wiping the seal with a lint-free microfiber cloth (while wearing gloves, of course).
Occasionally the seal will not be damaged but is just obstructed by some debris, so cleaning it off can do the trick.
If you camp in areas with hard water, you can also try some CLR to see if that will fix your problem – just turn the RV toilet water valve to the “off” position, empty the bowl, then pour a few ounces of CLR in there and let it sit to remove hard water buildup and deposits.
If that doesn’t work, try a thin layer of plumbers silicone grease on the seal.
If none of these easy fixes work, move on to the next RV toilet repair options.
How To Replace RV Toilet Bowl Seal
Step 1: Turn off the water supply to the toilet, then flush the toilet to empty the bowl and get rid of any water in the bowl and any water pressure that remains.
Step 2: Unbolt the RV toilet from the RV floor. There are two bolts, one on each side of the RV toilet.
Step 3: Disconnect the water supply from the back of the toilet.
Step 4: Lift up the toilet from the floor, and place it on a towel somewhere out of your way.
Step 5: Plug the waste hole with a rag so you don’t get any nasty or harmful odors coming out of your black water tank
Step 6: Locate the RV toilet seal which is a circular rubber ring, take it out, and replace it with the new seal.
Step 7: Read the instructions that came with your new seal: they may have specific guidelines for you to follow.
Step 8: Remove the rag from the waste hole, bolt the toilet back on, and reconnect the water supply.
Step 9: Turn the water supply back on and allow the RV toilet bowl to fill with water. Test to see if your RV toilet bowl will hold water, and if so, congratulations – you’ve just fixed your problem!
Check out this video that walks you through how to replace your RV toilet bowl seal step-by-step:
How To Fix RV Toilet Water Valve
Step 1: Turn off the water supply to your toilet
Step 2: Disconnect the water supply line from your RV’s toilet valve
Step 3: Flush the toilet to drain any water from the bowl
Step 4: Disconnect the water line from the vacuum breaker, normally located near the lower rear of the toilet
Step 5: RV toilet water valves usually snap in place using latches, so press the top and bottom of the latches on the toilet valve to release it, then pull the water valve out of the housing. You may need to also remove any screws that may be holding the valve in.
Step 6: Push the new water valve into place until the latches engage, and use any supplied fasteners or screws that came with it.
Step 7: Connect the water line to the vacuum breaker using the supplied clamp that came with your water valve.
Step 8: Connect the water supply back to the water valve.
Step 9: Turn on the water supply to your RV toilet, and see if it holds water.
See this video for a walkthrough on how to fix your RV toilet valve:
How To Fix RV Toilet Flange
Step 1: Turn off the water supply
Step 2: Empty the toilet by flushing it
Step 3: Disconnect the water supply to the toilet
Step 4: Unbolt the toilet from the floor and set the toilet on a towel out of your way
Step 5: Remove the rubber flange seal
Step 6: Unscrew the flange from the floor and turn the flange counter-clockwise until it detaches. If the flange has been glued in, you may consider hitting it with a chisel or softening the glue with a hair dryer until it’s able to be removed.
Step 7: Put the new RV toilet flange in, following the instructions that came with the flange. Some RV toilet flanges will require a waterproof marine adhesive to ensure a tight seal.
Step 8: Install a new rubber flange seal – don’t reuse the old one.
Step 9: Bolt the toilet back on to the RV floor, reconnect the water supply, and turn on the water supply to the toilet.
Here’s a great video showing the RV toilet flange repair process (along with what NOT to do):
How To Repair An RV Toilet Ball Valve
This repair is a little more involved, as it requires taking apart the base of your toilet.
Check out this video for a guide on how to repair your RV toilet ball valve:
FYI, sometimes the ball valve will simply slip off its hinge, and you can manually adjust it back into place with your hand while keeping the toilet flush pedal pressed down.
Obviously, wear gloves for this fix.
Wrapping Up How To Fix RV Toilet Not Holding Water
As you can see, fixing your RV toilet that won’t hold water comes down to a short list of reasons and they’re all pretty easy and cheap to complete.
It doesn’t matter whether you have a Thetford, Aqua-Magic, or Sealand RV toilet not holding water, the repairs and reasons are all the same.
What was the cause of your situation, and how did the repair process go? Do you have any tips or tricks that other RVers could benefit from?
Let us know in the comments below.
While you’re here, check out our guides to preparing for an RV one night freeze, 12 awesome RV outdoor kitchen mods, and how to fix an RV air conditioner freeze up.