
Winterizing an RV is an essential process that helps to protect your vehicle from damage during the cold winter months. This process involves removing all the water from the RV’s plumbing system to prevent the water from freezing and causing damage to the pipes, as well as preparing the RV for winter storage. Failure to winterize your RV can lead to costly repairs, so it’s important to follow the correct steps to ensure your RV is protected.
Knowing how to winterize an RV is key for any RV owner, and comes down to draining all water from your RV plumbing, putting in RV antifreeze, shutting off a few key elements, cleaning your RV, and preparing it for winter storage.
We’ll go through the entire process of how to winterize an RV step by step in this guide.
Understanding RV Winterization
Winterizing an RV is an essential step in protecting your investment from the harsh winter weather. It involves removing all the water from the RV’s water system to prevent freezing and damage to the pipes, tanks, and fixtures.
The process of winterizing an RV can vary depending on the type of RV and its water system. Some RVs have a simple water system, while others have a more complex system with multiple tanks and valves.
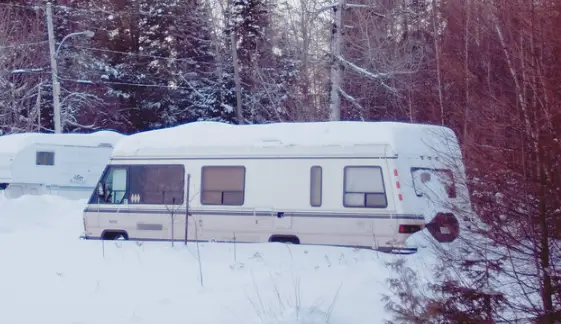
Winterizing an RV is a crucial step in protecting your investment and ensuring that it’s ready for use again when the weather warms up.
By following the proper steps below and using the right materials, you can help prevent costly damage and ensure that your RV is ready for your next adventure when the weather warms back up..
Gather Your RV Winterization Tools

Before beginning the winterization process, it is crucial to gather all the necessary tools to ensure a smooth and successful procedure. Here are some of the tools that one may need during the winterization process:
- RV Antifreeze: It is essential to have enough RV antifreeze to fill the entire water system of the RV. It is recommended to use non-toxic antifreeze, which is safe for the environment and the RV’s plumbing system.
See Related: How Much RV Antifreeze Do I Need?
- Air Compressor: An air compressor is used to blow out the water from the RV’s water lines. It is recommended to use an air compressor with a minimum of 30 PSI. See Related: How Much Air Pressure To Blow Out RV Water Lines?
- Blowout Plug: A blowout plug is connected to the RV’s city water inlet and used to blow out the water from the water lines.
- Water Pump Conversion Kit: A water pump conversion kit is used to pump antifreeze throughout the RV’s water system.
- Water Heater Bypass Kit: A water heater bypass kit is used to bypass the water heater during the winterization process.
- Hand Pump: A hand pump is used to pump antifreeze into the RV’s water system.
- Screwdriver: A screwdriver is used to remove the drain plug from the RV’s water heater.
- Flashlight: A flashlight is used to inspect all areas of the RV’s water system.
- Cordless Power Drill: A cordless power drill is used to remove the anode rod from the RV’s water heater.
- Wrenches and Needle Nose Pliers: Wrenches and needle nose pliers are used to remove any fittings or connections that need to be disconnected during the winterization process.
Make sure all of your tools are in good working condition before starting the winterization process. If any of the tools are damaged or not working correctly, it is recommended to replace them before starting the procedure.
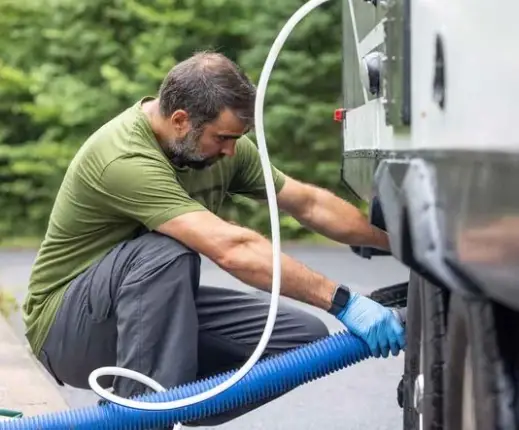
Step 1: Drain All Water From Your RV
Before starting the winterization process, it is important to prepare the RV to ensure that it is ready for the task. This section will cover the steps that need to be taken to prepare the RV for winterization.
The first step is to drain all the water from the RV’s water system. This includes the fresh water tank, holding tanks, and water lines. To do this, locate the RV low-point drains and open them to let the water flow out. It is also important to open all the faucets and flush the toilet to ensure that all the water is drained from the system.
Next, disconnect any outside water source that may be connected to the city water inlet. It is also recommended to disconnect any inline water filters or bypass them if they have a bypass. This will ensure that no water enters the RV’s water system during the winterization process.
Check the water heater bypass valve and make sure it is in the bypass position. This will prevent antifreeze from entering the water heater and potentially damaging it. Additionally, remove the water heater drain plug to allow the water to drain out.
Finally, turn off the RV water pump and open all the faucets to relieve any pressure in the water lines. This will make it easier to pump antifreeze through the system later on.
Remove All Water Filters
To properly winterize an RV, it is important to remove or bypass all water filters before running antifreeze through the plumbing lines. This is because the antifreeze can ruin the filters, rendering them useless in the spring when it’s time to de-winterize the RV.
To remove a water filter, simply turn off the water supply and unscrew the filter canister. Empty any water inside and discard the filter element. Some RVs may have multiple filters, so be sure to check all locations.
If the RV has a built-in water filtration system, it is important to bypass it before running antifreeze through the lines. This can typically be done by turning a valve or using a bypass kit.
It is also important to note that if the RV has a water softener, it should be bypassed or removed as well. Water softeners can also be damaged by antifreeze and can cause problems when de-winterizing.
Drain and Flush Your Gray and Black Water Tanks
One of the most important steps in winterizing an RV is to drain and flush the gray and black water tanks. These tanks can be a breeding ground for bacteria if left untreated, and the water inside can freeze, causing damage to the RV’s plumbing system.
See Related: How To Flush Your RV’s Black Water Tank
To begin, locate the drain valves for both the gray and black water tanks. These are typically located on the underside of the RV and can be opened by turning a valve handle. It is recommended to drain the black water tank first, followed by the gray water tank.
Once the tanks are drained, it’s time to flush them out. This can be done using a dedicated tank-cleaning tool or a garden hose with a sprayer attachment. Connect the hose or tool to the tank’s flush inlet and turn on the water. Allow the water to flow through the tank for several minutes, until the water runs clear.
It’s important to note that the tank-cleaning tool or hose should only be used for this purpose and should not be used for any other tasks, such as washing dishes or cleaning the RV. Doing so can contaminate the water system and lead to health hazards.
After flushing the tanks, it’s recommended to add a tank cleaner or deodorizer to the black water tank. This will help break down any remaining waste and prevent odors from developing.
Finally, close the drain valves and dispose of the wastewater at a dump station. It’s important to note that some dump stations may be closed during the winter months, so it’s important to plan ahead and locate a station that is open.
By properly draining and flushing the gray and black water tanks, RV owners can ensure that their plumbing system remains in good working order and avoid costly repairs due to frozen or damaged pipes.
See Related: Where To Dump RV Black Water and Can I Dump Gray Water On The Ground?
Drain and Flush Your RV Water Heater
The next step in winterizing your RV is to drain and flush the water heater. This will prevent any remaining water from freezing and causing damage to the heater’s tank or pipes.
The first step is to turn off the water heater and allow it to cool down for at least an hour. This will prevent any burns or injuries from hot water. Once the heater is cool, locate the drain valve on the bottom of the tank. Attach a hose to the valve and run the other end of the hose to a safe location to drain the water.
After draining the water, it is important to flush the tank to remove any remaining sediment or debris. One way to do this is to use a wand attachment at the end of a hose to clean the inside of the tank. This is also a good time to check the anode rod, which should be replaced if corroded.
It is recommended to leave the drain plug open during storage to prevent any remaining water from freezing and causing damage to the tank.
| Step | Instructions |
| 1 | Turn off the water heater and allow it to cool down for at least an hour. |
| 2 | Locate the drain valve on the bottom of the tank and attach a hose to the valve. |
| 3 | Run the other end of the hose to a safe location to drain the water. |
| 4 | Flush the tank using a wand attachment at the end of a hose to remove any remaining sediment or debris. |
| 5 | Check the anode rod and replace if corroded. |
| 6 | Leave the drain plug open during storage to prevent any remaining water from freezing and causing damage to the tank. |
Bypass Your RV Water Heater
Bypassing your water heater is the step to prevent RV damage from freezing temperatures. By bypassing the water heater, you can drain the tank and keep it safe for winter storage.
Here are the steps to bypass your RV water heater:
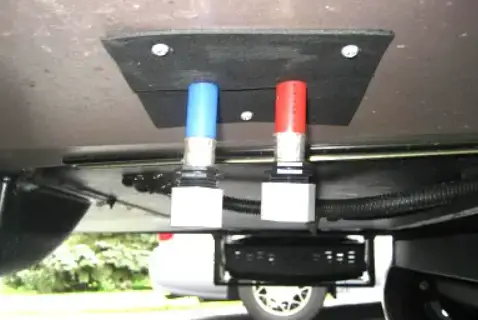
- Locate the water heater bypass valve. This can be found in the convenience center, connected to the water pump, or on the back of the water heater. If you’re not sure where it is, consult your RV owner’s manual.
- Turn the bypass valve to “on” or “winterize” position. This will allow water to bypass the water heater and flow directly through the plumbing system.
- Drain the water heater tank. Open the pressure relief valve and remove the drain plug to allow the water to drain out.
- Close the pressure relief valve and replace the drain plug.
- Turn off the bypass valve when you’re ready to use the RV again.
It’s important to note that if you blew out the water system using the dry method, the water lines and fixtures on the outlet side of the water heater shouldn’t have any water in them to freeze and cause damage. However, it’s still a good idea to bypass the water heater to ensure that it’s completely drained and protected during the winter months.
Drain The Fresh Water Tank
Draining the fresh water tank is an essential step in winterizing your RV. Here are the steps to follow:
- Turn off the water pump and disconnect the city water supply.
- Locate the drain valve for the fresh water tank. This valve is usually located at the bottom of the tank.
- Open the valve and let the water drain out completely. It is recommended to use a hose to direct the water away from your RV and towards a designated dumping station.
- Once the tank is empty, close the valve and move on to the next step.
It is important to note that before draining the fresh water tank, you should also drain the hot water tank and bypass it. This ensures that no water is left inside the water heater and prevents it from freezing and potentially causing damage.
Additionally, it is recommended to flush the toilet until water stops flowing and run water through the shower, kitchen sink, bathroom sink, and outdoor shower to remove any remaining water from the system.
Before proceeding to the next step, make sure that all water filters are removed and bypassed. This ensures that antifreeze will not flow through the filters and potentially damage them.
Empty The Low Point Drain
To ensure that all the water is removed from the RV’s plumbing system, it’s important to empty the low point drain. This is typically located underneath the vehicle near the water heater. Here are the steps to follow:
- Open the low point drain by removing the cap or turning the valve counterclockwise.
- Allow all the water to drain out completely.
- Once all the water has drained out, recap the drain and close the valve.
It’s important to note that the low point drain is not the same as the fresh water tank drain. The fresh water tank drain should also be opened to allow all the water to drain out.
By emptying the low point drain, you’re ensuring that there is no water left in the pipes that could freeze and cause damage to the RV’s plumbing system. It’s a simple step that can save you a lot of headaches and money in the long run.
It’s also a good idea to check the owner’s manual for specific instructions and recommendations for winterizing your RV. Different models and manufacturers may have slightly different procedures.
Step 2: Apply RV Antifreeze
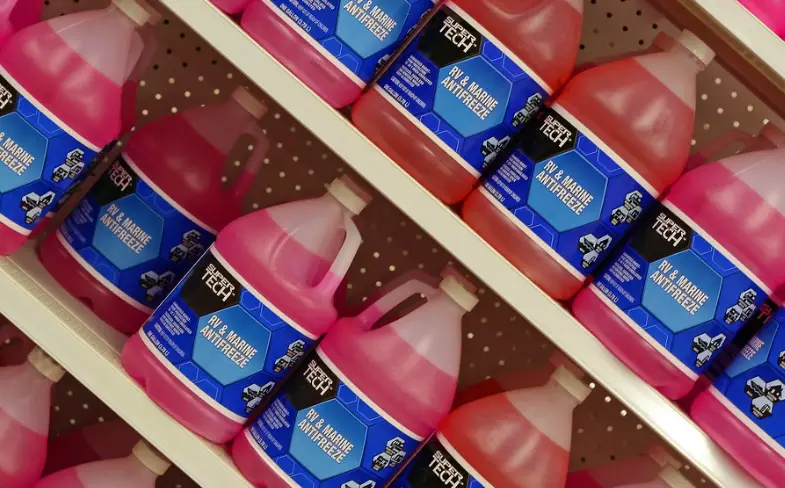
To protect your RV’s plumbing system from freezing during the winter months, it is necessary to apply RV antifreeze. This process involves pumping the antifreeze through the water lines, plumbing system, and water heater to ensure that all water is removed and replaced with antifreeze.
RV antifreeze is typically pink in color, making it easy to identify and differentiate from regular antifreeze. It is important to use RV-specific antifreeze, as regular antifreeze can be toxic and harmful to humans and pets.
Before applying RV antifreeze, it is important to ensure that the water pump is turned off and that all water has been drained from the plumbing system. To apply the antifreeze, follow these steps:
- Pour the RV antifreeze into the fresh water tank. The amount of antifreeze needed will depend on the size of your RV and its plumbing system. Refer to the manufacturer’s instructions for guidance on how much antifreeze to use.
- Turn on the water pump and open each faucet, one at a time, until the pink antifreeze comes out. Be sure to include both hot and cold water faucets, as well as the shower and toilet.
- Once the antifreeze is flowing, turn off the faucet and move on to the next one. Repeat this process until all faucets have been flushed with antifreeze.
- To ensure that the water heater is also protected, turn it on and let it run until the antifreeze is coming out of the hot water faucet.
- If your RV has a siphon hose for the water heater, be sure to insert it into the antifreeze container to ensure that the water heater is also filled with antifreeze.
Step 3: Open Your RV’s External Valves And Faucets
To begin the winterization process, it is essential to open all external valves and faucets of your RV. This step ensures that all water is drained out of the system, preventing any damage from freezing temperatures.
To open the external valves and faucets, follow these steps:
- Turn off the water pump and disconnect any outside water source.
- Open all the hot and cold water faucets, including the showerhead and outdoor shower, to allow the water to drain out.
- Flush the toilet to remove any remaining water from the bowl and tank.
- Open the low point drain valves to drain the remaining water from the system.
It is important to note that some RVs may have additional external valves or faucets that need to be opened, such as an outdoor kitchen sink or a black tank flush. Refer to your RV owner’s manual for specific instructions.
Once all the external valves and faucets are opened, the next step is to drain the water heater. This can be done by removing the drain plug and opening the pressure relief valve. Be sure to check the anode rod and replace it if necessary.
By opening the external valves and faucets, you can ensure that all water is drained from the system, preventing any damage from freezing temperatures. This step is crucial in the winterization process and should not be overlooked.
Step 4: Open Your RV’s Internal Valves And Faucets

To prevent any remaining water from freezing and damaging the RV’s plumbing system during winter, it’s essential to open all internal valves and faucets. This allows the water to drain out of the pipes and prevent any damage.
Begin by turning off the RV’s water pump and disconnecting the city water supply. Next, open all the faucets, including the hot and cold water taps, and the showerhead. This will help to release any pressure in the system and allow the water to drain out.
After opening all the faucets, don’t forget to flush the toilet and open the outside shower or sink if the RV has one. This will ensure that all the water is drained out of the entire plumbing system.
It’s important to note that while opening the faucets, you should start from the highest point in the RV and work your way down to the lowest point. This will ensure that all the water is drained out of the system.
Once all the faucets and valves have been opened, leave them in this position until the winterization process is complete. This will ensure that all the water has drained out of the pipes and prevent any damage from occurring.
Step 5: Pour Antifreeze In Your Drains And P-Traps
To prevent any remaining water in the RV’s plumbing system from freezing, it is important to pour antifreeze into all of the drains and P-traps. This will ensure that any water left in the system will not freeze and cause damage to the pipes.
To do this, follow these steps:
- First, make sure all of the faucets are turned off and the water pump is turned off.
- Next, pour antifreeze into each drain, including the sink, shower, and toilet. Be sure to use enough antifreeze to fill the P-trap.
- After pouring antifreeze into all of the drains, flush the toilet a few times to ensure that the antifreeze has made its way through the entire system.
- Lastly, pour a small amount of antifreeze into the toilet bowl and flush it one last time.
Step 6: Close All Faucets And Valves
After draining all the water from the RV’s plumbing system, the next step is to close all the faucets and valves. This is to ensure that no more water can enter the system and potentially freeze, causing damage to the pipes and other components.
Begin by closing all the faucets, both hot and cold, inside the RV. Then, go outside and close the low point drains and any other valves that were opened during the draining process. If the RV has a water pump, turn it off and close its bypass valve.
It’s also important to remember to close the fresh water tank drain valve and the water heater drain valve. If the RV has an external shower or other outdoor faucets, make sure to close them as well.
Once all the faucets and valves are closed, turn the water pump back on and pressurize the system. Check for any leaks or drips and fix them if necessary.
By closing all the faucets and valves, the RV’s plumbing system is now protected from any potential damage that could be caused by water freezing and expanding inside the pipes.
Step 7: Turn The Hot Water Heating Element Off
To prevent damage to the hot water heating element, it is important to turn it off before beginning the winterization process. This will also help to conserve energy and prevent unnecessary heating of water that will not be used.
To turn off the hot water heating element, follow these steps:
- Locate the hot water heater. It is typically located in a cabinet or compartment on the exterior of the RV.
- Turn off the power to the hot water heater. This can be done by either unplugging the RV from shore power or turning off the circuit breaker that powers the hot water heater.
- Allow the hot water heater to cool down completely before proceeding with the winterization process.
It is important to note that the hot water heater should not be turned back on until the RV is ready to be used again in the spring. Failing to do so can result in damage to the heating element and other components of the hot water heater.
By turning off the hot water heating element, RV owners can ensure that their water heater is protected during the winter months and that they are not wasting energy heating water that will not be used.
Step 8: Remove All Food From Your RV
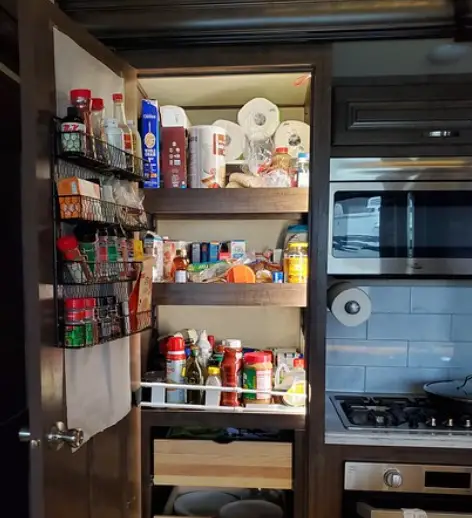
One important step in winterizing an RV is to remove all food from the vehicle. This is crucial to prevent spoilage, keep mice out of your RV, and minimize odors during the winter months. The temperature inside an RV can drop significantly during the winter, making it difficult to keep perishable items fresh.
To remove all food from the RV, start by taking out any non-perishable items, such as canned goods and dry goods. These items can be stored in a pantry or cupboard in the home. Next, remove any perishable items, such as fruits, vegetables, dairy products, and meats. These items should be thrown away or consumed before winterizing the RV.
It is also important to remove any opened or partially used containers of food, such as condiments, spices, and cooking oils. These items can spoil or attract pests during the winter. Store these items in airtight containers in the home or dispose of them properly.
In addition to removing all food, it is also recommended to clean the RV thoroughly before winterizing it. This includes wiping down all surfaces, cleaning the refrigerator and freezer, and removing any crumbs or debris. A clean RV will help prevent pests and odors from developing during the winter months.
Securing the RV Appliances
When winterizing an RV, it is important to secure all appliances to prevent damage from freezing temperatures. Here are some tips on how to secure the most common RV appliances:
Refrigerator
The first step in securing an RV refrigerator is to turn it off and unplug it. Next, remove all food and clean the interior thoroughly. Leave the doors open to allow for air circulation and prevent mildew growth. It is also recommended to prop the doors open slightly to prevent them from sealing shut.
Washing Machine
To secure an RV washing machine, first turn off the water supply and disconnect the hoses. Drain any remaining water from the hoses and the washing drum. Leave the door open to allow for air circulation and prevent mildew growth.
Ice Maker
If your RV has an ice maker, turn it off and unplug it. Drain any remaining water from the lines and the ice maker itself. Leave the door open to allow for air circulation.
Exhaust Pipe
It is important to cover the RV’s exhaust pipe to prevent rodents and other pests from entering. Use a wire mesh or other suitable material to cover the exhaust pipe opening.
Power
Before winterizing, make sure to disconnect the RV from any external power sources. This includes unplugging the RV from shore power and turning off the generator. This will prevent any electrical damage from power surges or lightning strikes.
Propane
If your RV uses propane, make sure to turn off the propane tanks and disconnect any propane lines. This will prevent any gas leaks or fire hazards during the winter months.
See Related: Can Propane Freeze?
Disconnect Any Batteries, Propane Tanks, and Solar Panels
Before winterizing an RV, it is important to disconnect all batteries, propane tanks, and solar panels. This is to prevent any damage that may occur during the winter months when the RV is not in use.
First, disconnect the batteries by turning off the main power switch. This will prevent any electrical drain on the batteries and preserve their lifespan. It is also recommended to remove the batteries from the RV and store them in a cool, dry place.
Next, disconnect the propane tanks by turning off the valve and removing them from the RV. This is important to prevent any leaks or accidents that may occur during the winter months. It is also recommended to store the propane tanks in a cool, dry place away from any potential heat sources.
Finally, disconnect any solar panels by turning off the solar panel disconnect switch. This will prevent any electrical charge from the solar panels and protect them from any potential damage. It is also recommended to cover the solar panels with a protective cover to prevent any debris or snow from accumulating on them.
Protecting the RV Exterior
When preparing an RV for winter storage, it’s important to protect the exterior from damage caused by the elements. Here are some tips to help keep your RV in good condition during the colder months.
Clean the Exterior
Before storing your RV, it’s important to thoroughly clean the exterior. This will help prevent dirt, grime, and other debris from causing damage to the paint or other surfaces. Use an appropriate cleaner for your RV’s exterior and make sure to remove any pine pitch or other substances that could cause damage.
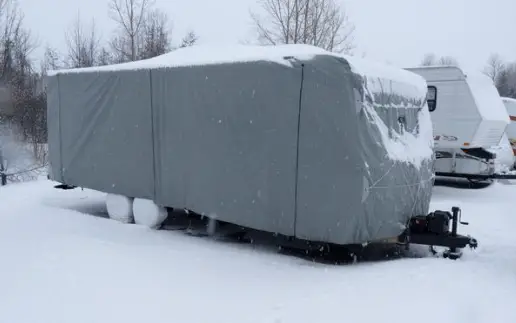
Cover the RV
One of the best ways to protect your RV from the elements is to cover it with a specially designed RV cover. These covers are made from durable materials that can withstand the elements and help prevent damage from moisture, UV rays, and other factors.
See Related: Should You Cover Your RV In Winter?
Protect the Tires
Tires can be especially vulnerable during the winter months, so it’s important to take steps to protect them. Make sure your tires are properly inflated and consider using tire covers to help prevent cracking and other damage.
See Related: Preventing RV Tire Dry Rot
Protect the Leveling Jacks
If your RV has leveling jacks, it’s important to protect them from the elements as well. Consider using covers or other protective measures to help prevent damage from moisture, ice, and other factors.
Protect the Exhaust Pipe
Finally, it’s important to protect the exhaust pipe from damage caused by moisture, debris, and other factors. Consider using an exhaust pipe cover or other protective measures to help keep your RV’s exhaust system in good condition.
By taking these steps to protect the exterior of your RV, you can help ensure that it stays in good condition during the winter months and is ready for use when the weather warms up again.
Set The Parking Brake and/or Wheel Chocks
When winterizing an RV, setting the parking brake and/or using wheel chocks is an important step to prevent any unwanted movement of the vehicle. These safety measures are particularly important when working on an incline or on uneven ground.
Using wheel chocks is a simple but effective way to prevent the RV from rolling or shifting during the winterization process. Place the chocks snugly against the tires on both sides of the RV to keep it in place. It is also recommended to use wheel chocks in combination with the parking brake for added security.
Setting the parking brake is another important step to take when winterizing an RV. This will help to keep the RV stationary and prevent it from rolling or shifting. It is important to ensure that the parking brake is engaged properly and that it is holding the RV in place.
If the RV has a hydraulic brake system, it is important to follow the manufacturer’s instructions for engaging the parking brake. Some RVs may also have an air brake system, which requires a different procedure for setting the parking brake. Refer to the owner’s manual for specific instructions on how to set the parking brake for your particular RV.
Potential Issues and Solutions
Winterizing an RV is a crucial task to ensure that it remains in good condition during the winter months. However, there are potential issues that may arise if the winterization process is not done correctly. Here are some common issues that RV owners may encounter and their possible solutions:
Broken or Burst Pipes
One of the most common issues that RV owners may face during the winter is broken or burst pipes. When water freezes, it expands, which can cause pipes to crack or burst. To prevent this from happening, RV owners should ensure that all water is drained from the RV’s plumbing system and that antifreeze is added to prevent any remaining water from freezing.
Frozen Pipes
Frozen pipes can also be a problem during the winter months. If water is not completely drained from the RV’s plumbing system, any remaining water can freeze and cause the pipes to burst. RV owners should ensure that all water is drained from the RV’s plumbing system and that antifreeze is added to prevent any remaining water from freezing.
Mold and Moisture Buildup
Mold and moisture buildup can occur in an RV that is not properly winterized. Moisture can accumulate in the RV’s plumbing system and cause mold to grow. RV owners should ensure that all water is drained from the RV’s plumbing system and that antifreeze is added to prevent any remaining water from freezing. Additionally, RV owners should ensure that the RV is well-ventilated to prevent moisture buildup.
See Related: How To Get Rid Of Mold In A Camper
Rodents and Pests
Rodents and pests can be a problem during the winter months if the RV is not properly sealed. RV owners should ensure that all openings are sealed to prevent rodents and pests from entering the RV. Additionally, RV owners should remove all food products from the RV to discourage rodents and pests from entering.
Bacteria and Sediment
Bacteria and sediment can accumulate in an RV’s plumbing system if it is not properly winterized. RV owners should ensure that all water is drained from the RV’s plumbing system and that antifreeze is added to prevent any remaining water from freezing. Additionally, RV owners should flush out the RV’s plumbing system before winterizing to remove any bacteria and sediment.
How Much Does It Cost To Winterize An RV?

Winterizing an RV is an essential step for any RV owner who wants to protect their vehicle from the harsh winter weather. While it is possible to pay for professional winterizing services, many RV owners choose to do it themselves to save money.
The cost of winterizing an RV can vary depending on several factors, including the size and model of the RV, the type of antifreeze used, and whether the owner chooses to do it themselves or hire a professional.
For those who choose to do it themselves, the cost can range from $30 to $100, depending on the type and amount of antifreeze used. It is important to note that RV antifreeze is different from automotive antifreeze and should not be used interchangeably.
Hiring a professional to winterize an RV can cost anywhere from $130 to $170, depending on the size and class of the RV. While this may seem like a significant expense, it is important to consider the potential cost of repairs that could result from not properly winterizing the RV.
It is also important to note that the cost of winterizing an RV is a recurring expense, as it must be done every year before the winter season. However, the cost can be offset by the potential savings from avoiding costly repairs resulting from not properly winterizing the RV.
Before you go, check out our guide on how to dewinterize your RV in the spring so you’re ready for your next adventure!